3D printing opens up a world of creativity and innovation for everyone. You can learn the basics of 3D printing quickly and start creating your own designs. Whether you want to make prototypes, art, or practical items, understanding how 3D printers work is the first step.

In this beginner’s guide, you will discover the materials used in 3D printing, the design process, and how to troubleshoot common issues. Knowing these steps will help you feel confident in using your 3D printer effectively. Get ready to transform your ideas into reality and explore the endless possibilities that 3D printing offers.
Make sure to check out high-quality models to kickstart your projects and inspire your creativity. With the right tools and knowledge, you will be well on your way to becoming a proficient 3D printing enthusiast.
Key Takeaways
- Learn the basic functions of 3D printers.
- Understand essential materials and design techniques.
- Troubleshoot common printing issues effectively.
Understanding 3D Printers

3D printers come in various types and each works in its own way. When choosing a printer, it’s important to know what fits your needs best. This section will guide you through the different types of printers, how they work, and tips for selecting your first one.
Types of 3D Printers
There are several main types of 3D printers. The two most common are FDM (Fused Deposition Modeling) and SLA (Stereolithography).
- FDM Printers: These printers use a plastic filament, which is heated and extruded to create layers. FDM is popular because it’s usually more affordable and user-friendly, making it ideal for beginners.
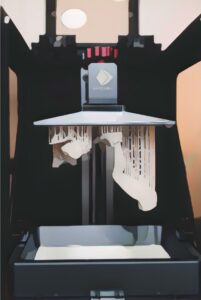
- SLA Printers: SLA printers use a liquid resin that hardens when exposed to light. They can produce very detailed and smooth finishes but are often more expensive and require more post processing.

How 3D Printers Work
3D printing starts with a 3D design. You can create your own design using software or download existing ones from online libraries.
- A slicer software reads the design and slices it into layers. These layers become instructions that will be loaded into the 3D printer later.
- In FDM printing, the machine reads these instructions and the hot filament is extruded layer by layer to build the object.
- In SLA, a laser or a masked source of UV light shines on the resin and hardens each layer.
This process continues until the whole object is complete. Each technology offers different strengths, so think about what you need for your projects.
Choosing Your First 3D Printer
When selecting your first 3D printer, consider your budget, the materials you want to use, and the type of projects you’re interested in.
- Budget: Determine how much you are willing to spend. FDM printers range from $200 to $500 for entry-level options.
- Materials: Make sure the printer can handle the types of filament or resin you plan to use. Some printers work better with specific materials.
- Community and Support: Look for printers with active user communities. This can help you find resources and troubleshoot problems more easily.
Choosing the right 3D printer can make a big difference in your printing experience.
Materials for 3D Printing

When starting with 3D printing, understanding the materials you can use is essential. Different types of filaments each have unique properties that affect your projects. Here’s what to know about choosing and handling these materials.
Choosing the Right Filament
Selecting the right filament is crucial for your 3D printing project. The most common types include:
- PLA (Polylactic Acid): This is a plant-based material. It is easy to use, biodegradable, and good for basic prints.
- ABS (Acrylonitrile Butadiene Styrene): Strong and heat-resistant, but can emit fumes while printing. It requires a heated bed to avoid warping.
- PETG (Polyethylene Terephthalate Glycol): Offers good strength and flexibility. It’s a bit harder to print than PLA but doesn’t warp easily. It’s a good balance between PLA and ABS. Even carbon fiber-reinforced variants are available.
Consider your project’s requirements. For example, if you need durability, ABS or PETG may be better. If you prioritize ease of use, go with PLA.
Want a deeper dive into filament options and how to pick the best one for your needs? Check out our Choosing the Right3D Printing Filament: A Beginner’s Guide for expert tips and insights to help you make the right choice.
Understanding Filament Properties
Each filament type has unique properties that affect how they print and their final appearance.
- PLA: Low shrinkage, good layer adhesion, and vibrant colors. Ideal for models that don’t need to withstand high temperatures.
- ABS: Higher strength and impact resistance. It can be sanded and painted post-printing. However, it may require an enclosed printer due to warping.
- PETG: Good chemical resistance and flexibility. It’s suitable for functional parts and doesn’t require a heated bed, making it user-friendly.
You should also check the recommended print temperatures and settings for each type. This ensures optimal results and avoids printing issues.
Storing and Handling Filaments
Proper storage and handling of filaments help maintain their quality. Here are some tips:
- Keep Dry: Filaments can absorb moisture, which affects printing. Use airtight containers with silica gel packs to keep them dry.
- Avoid Heat: Store filaments in a cool, shaded place. Excess heat can deform the spools and affect the filament’s performance.
- Check Expiration: Filaments can degrade over time. Check for discoloration or brittleness before printing.
By ensuring proper conditions, you can keep your materials in great shape, leading to better prints and fewer failures.
Design and Modeling for 3D Printing

Creating 3D models is a key part of 3D printing. You’ll need the right tools and an understanding of the steps to make your ideas come to life.
Creating Your First 3D Model
To start, choose a simple object to model. Basic shapes like cubes or spheres are great for beginners. You might use a sketch or a photo as a guide.
Using software, you can build your model by combining shapes. Focus on precision and simple designs. Your model should be saved as an STL, 3MF or OBJ file, which are the standard formats for 3D printing.
If you’re new, many online tutorials can help you learn. Joining 3D printing communities will provide additional support and inspiration.
Software for 3D Design and Modeling
Selecting the right software is crucial. Here are a few popular options:
- TinkerCAD: Great for beginners. It is user-friendly and web-based.
- Blender: More advanced, with powerful features for detailed modeling.
- Fusion 360: A professional tool that combines design and engineering capabilities.
For slicing your 3D model, consider:
- Ultimaker Cura: A popular slicer tool that is free and easy to use.
- OrcaSlicer: It allows multiple configuration options and very deep control over the printing characteristics (exact positioning of seams, placement of supports, scarf seams, etc.). It offers perfect compatibility with Bambu printers.
- Slic3r: Known for its customization options and advanced settings.
To discover more software options perfect for beginners, check out our Top 5 Free 3D Printing Software Tools for Beginners for an in-depth look at tools to kickstart your 3D printing journey.
From Concept to Model: A Workflow
Start by brainstorming your idea. Sketching it out can help visualize the dimensions and features. Once you have your concept, move to the software.
Import ideas into the program and begin modeling. Build your design step-by-step, using tools like extrusion and scaling. After finishing the model, check for errors and ensure it is manifold.
Finally, export your work as an STL, 3MF or OBJ file, which are ready for slicing. Load it into your chosen slicing software, adjust the settings for your printer, and then prepare for printing.
Slicing and G-Code Generation in FDM Printers

Slicing is a crucial step in 3D printing. It converts your 3D model into instructions that the printer can understand. These instructions are known as G-code. This section covers the details of slicing, the tools available, and tips to optimize your print settings.
Introduction to Slicing
Slicing breaks down your 3D model into layers. Each layer is created according to the settings you choose. These settings include layer height, print speed, and temperature among many other parameters. After slicing, the model is converted into G-code, a language that tells your printer how to move and extrude filament. Without this process, your printer won’t know how to create the object you designed.
Slicing Software Tools
There are many slicers available. Popular options include Ultimaker Cura, Simplify3D, Slic3r, and OrcaSlicer. Each has its features and user interface.
| Software | Price | Key Features |
|---|---|---|
| Ultimaker Cura | Free | User-friendly, easy to use |
| Simplify3D | Paid | Advanced features, customizable |
| Slic3r | Free | Open-source, flexible settings |
| OrcaSlicer | Free | Deeply customizable settings |
These tools allow you to adjust settings based on your project requirements. Choose the software that suits your needs best.
Optimizing Print Settings
Optimizing your print settings is vital for quality prints. Pay attention to the following settings:
- Layer Height: Lower heights improve detail but increase print time.
- Infill Density: Higher density adds strength but uses more material.
- Print Speed: Slower speeds enhance quality, while faster speeds reduce time.
- Temperature: Adjust based on filament type for better adhesion.
Testing different settings can help you find the best combination for your specific printer and materials. Make small adjustments and observe the results closely. This approach leads to better prints and less waste.
The 3D Printing Process and Troubleshooting

3D printing involves multiple steps, from preparing your model to addressing common issues that can arise during printing. Understanding each part of the process ensures better results and more successful prints.
Preparing to Print: Slicing Software and Settings
Before printing, you need to convert your 3D model into a format your printer can understand. This is done using slicing software. Programs like Cura take your model (usually in STL format) and convert it into G-code, which is the language 3D printers read.
When using slicing software, pay attention to these key settings:
- Layer Height: A lower height results in finer detail but increases print time.
- Print Speed: Adjusting this can help prevent issues like stringing or blobbing.
- Infill Density: Determine how solid your print needs to be; more infill adds strength but also weight.
Take your time to experiment with these settings for the best results.
For perfect prints, your slicing settings are just the start. Proper calibration is equally critical to ensure everything works seamlessly. Don’t miss our How to Calibrate Your 3D Printer for Perfect Prints guide for step-by-step instructions to fine-tune your printer and achieve flawless results every time.
The First Layer: Starting a Successful Print
The first layer is crucial for a successful print. Proper adhesion to the print bed sets the stage for the entire process. Here are ways to ensure a great first layer:
- Bed Leveling: Ensure your print bed is level to prevent warping, and extrusion problems.
- Temperature Settings: Set the right temperature for your filament. For instance, PLA typically prints well at around 190-210°C.
- First Layer Height: This should be slightly higher than normal to allow for a good spread of material.
Watch the first layer closely as it prints. If it looks uneven or does not stick, pause the print and adjust settings.
Common Printing Challenges and Solutions
You may face some challenges when 3D printing. Here are some typical problems and their solutions:
- Warping: This happens when the edges of a print lift. Solution: Use a heated bed and consider applying an adhesive, like glue stick or hairspray, to improve bed adhesion.
- Under-Extrusion: If parts of your model look too thin or missing, it could be due to clogs or incorrect settings. Solution: Check the nozzle, increase print temperature, and ensure your filament is not tangled.
- Stringing: Fine strands of filament can appear between parts. Solution: Lower print speed and enable ‘retract’ settings in your slicing software. In case this setting is already activated, adjust the retraction distance and speed.
By troubleshooting these common issues, you can improve your printing experience.
Conclusions

3D printing offers exciting opportunities for creativity and innovation. As a beginner, you have access to tools and resources to start your journey.
Key Points to Remember:
- Get Familiar: Learn basic terms and concepts. Understanding the technology helps you make better choices.
- Choose the Right Printer: Select a printer that fits your needs and budget. Research different models before buying.
- Materials Matter: Different materials give different results. Common options are PLA, ABS, and PETG.
- Practice Design: Use software like Blender, Tinkercad or Fusion 360 for 3D design. Start simple and gradually take on more complex projects.
Helpful Tips:
- Start Small: Begin with easy projects to build your skills.
- Join a Community: Engage with online forums or local groups. You can learn a lot from others’ experiences.
- Troubleshoot: Don’t get discouraged by failures. Troubleshooting is a normal part of the process.
3D printing can be a rewarding hobby or career path. With patience and practice, you can create amazing things. Focus on learning and enjoy the journey.

